DIY window tint removal poses significant risks, including permanent glass scratching, damage to defroster lines, and adhesive contamination, which can increase long-term repair costs. Professional removal services reduce these risks by using controlled-heat systems, automotive-safe chemical agents, and non-abrasive separation techniques specifically designed for modern automotive glass systems. The difference is fundamentally between process control and manual trial and error.
Risk Overview: DIY vs Professional Tint Removal
Window tint film is bonded using pressure-sensitive adhesive layers that chemically stabilize over time due to UV exposure and repeated thermal cycling. As the adhesive cures, removal becomes less about peeling and more about controlled separation of polymer layers from glass.
| Category | DIY Removal Risks | Professional Removal Outcomes |
| Glass clarity | Scratches, haze, micro-abrasions | Maintained optical transparency |
| Defroster system | High risk of line damage | Protected and preserved |
| Adhesive residue | Uneven, sticky contamination | Fully neutralized and removed |
| Time investment | 2–6+ hours with rework | 30–90 minutes typical |
| Chemical safety | Unregulated household products | Automotive-grade solutions |
| Final finish | Inconsistent results | Uniform restoration |
The key difference is not just tools; it is process sequencing and material understanding.
Why DIY Window Tint Removal Fails in Real Conditions
1. Adhesive Behavior Changes Over Time
As tint ages, adhesives transition from flexible bonding agents to semi-rigid polymer films. Without staged heat application, the film tears unpredictably, increasing residue complexity.
2. Glass Damage Accumulates Gradually
Damage rarely appears as a single visible scratch. Instead, repeated scraping creates micro-abrasions that scatter light. These become visible under night driving conditions or in direct sunlight.
3. Defroster Lines Are Structurally Fragile
Rear defroster grids consist of thin conductive traces bonded directly to the glass surface. Even minor scraping pressure can break continuity, leading to partial or full heating failure that cannot be easily repaired.
4. Heat Mismanagement Leads to Fragmentation
Uneven heating creates inconsistent adhesive softening, causing:
- Patchy film release
- Increased tearing
- Higher adhesive residue load
This significantly extends removal time and increases risk of surface contamination.
5. Chemical Overuse Creates Secondary Damage
Improper solvent use can degrade rubber seals, stain interior trim, and introduce strong vapors in enclosed cabin environments, especially when ventilation is insufficient.
Risks in Professional Tint Removal Services
Professional services significantly reduce risk but still depend on technicians’ expertise and equipment quality.
1. Technician Skill and Experience
Experienced technicians evaluate:
- Film type (dyed, metallic, ceramic)
- Installation age and UV exposure level
- Glass sensitivity zones (especially rear defrosters)
Poor technique can still cause damage if scraping is improper or overheating occurs.
2. Equipment Precision
High-quality professional systems typically include:
- Steam-assisted heat control
- Non-metallic separation tools
- Automotive-grade adhesive dissolvers
Lower-tier setups may still rely heavily on mechanical scraping.
3. Operational Tradeoffs
Professional removal requires scheduling and vehicle downtime. While this adds inconvenience, it significantly reduces variability in outcomes.
Real-World Service Observations
In practical automotive environments, tint removal issues are often secondary problems caused by improper DIY attempts.
In Scotts Mills, technicians frequently encounter rear window damage after aggressive scraping, especially when customers later upgrade or replace films.
In Bella Casa, multi-layer tint installations are common, where previous DIY attempts have left uneven adhesive layering that requires staged chemical remediation.
In Downtown Apex, older vehicles often arrive with partially removed tint that leaves bonded residue, requiring full glass reconditioning before new installation can occur.
These cases consistently show that removal technique has a greater impact on outcomes than film type itself.
When DIY Removal Might Be Reasonable
There are limited scenarios where DIY removal may be acceptable:
- Very recent tint installation (low adhesive curing)
- Non-rear windows without defroster lines
- Temporary or low-quality film applications
Even in these cases, careful heat control and non-metal tools are still required to minimize risk.
However, once tint exceeds typical UV exposure cycles, the risk profile increases sharply.
Definition List: Core Technical Terms
Pressure-Sensitive Adhesive (PSA)
A bonding layer that strengthens over time under heat and UV exposure, making aged tint progressively harder to remove.
Thermal Activation Window
The temperature range at which adhesive softens enough to allow safe separation without tearing.
Cohesive Separation
A clean removal outcome in which the film detaches as intact sheets with minimal residue.
Residue Load Index
The amount of adhesive material remaining on the glass after removal; higher levels increase cleaning complexity.
Defroster Trace Sensitivity
The vulnerability of rear glass heating lines to mechanical or chemical disruption.
Common Misconceptions About Tint Removal
“Tint behaves like a removable sticker”
This is only true immediately after installation. Over time, adhesives chemically bond with glass surfaces and behave more like cured polymers.
“Scraping carefully eliminates risk”
Even controlled scraping introduces microscopic abrasions that accumulate over time, reducing optical clarity.
“Heat alone guarantees clean removal”
Heat softens the adhesive but does not completely break down polymer bonds without chemical assistance.
“DIY removal is always cheaper”
Initial savings often overlook downstream costs such as glass replacement, defroster repair, or corrective detailing.
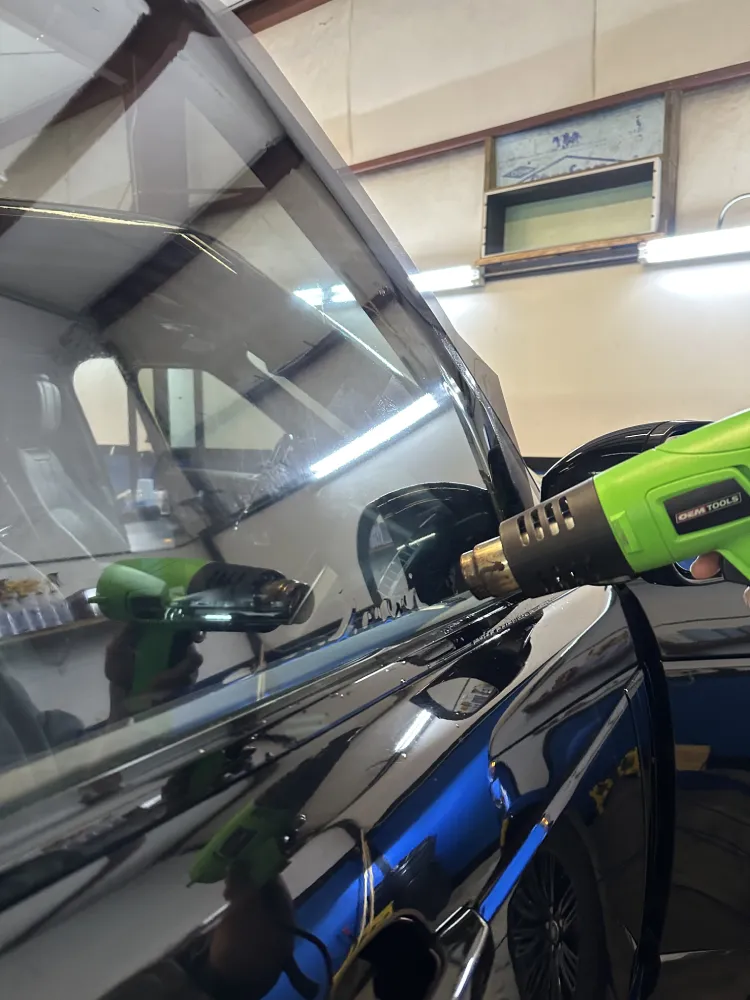
Controlled Professional Removal Workflow
Step 1: Thermal Conditioning
Even heat distribution is applied to soften adhesive bonds without inducing thermal stress in the glass.
Step 2: Film Separation Strategy
Film is removed in controlled sections or full sheets depending on adhesive response and film type.
Step 3: Adhesive Breakdown Phase
Automotive-safe solutions are applied to dissolve residual polymer layers without damaging factory coatings.
Step 4: Surface Refinement
Non-abrasive tools restore full optical clarity and remove any remaining haze or residue.
This structured workflow minimizes variability compared to manual DIY approaches.
About Professional Automotive Surface Preparation
High-quality tint removal is not an isolated service; it is part of a broader surface preparation system. Phenomenal Detailing employs structured methodologies to preserve the integrity of glass while ensuring optimal conditions for future film installation and protective treatments.
In practice, this becomes critical when preparing vehicles for upgraded film systems such as window tinting in Apex, NC, where surface contamination or micro-scratching can significantly reduce adhesion quality and visual clarity.
Risk Profile by Vehicle Condition
New Installations (Under 1 Year)
- DIY risk: Moderate
- Professional benefit: Fast removal, low residue
Aged or UV-Exposed Tint
- DIY risk: High
- Professional benefit: Controlled chemical-assisted separation
Rear Defroster Windows
- DIY risk: Very high
- Professional benefit: Protected extraction process
Multi-Layer Tint Systems
- DIY risk: Extremely high complexity
- Professional benefit: Multi-stage removal required
Why Removal Quality Impacts Future Film Performance
Poor tint removal leaves behind invisible defects that directly affect future installation outcomes:
- Micro-abrasions that distort light transmission
- Adhesive film remnants that prevent proper bonding
- Uneven surface energy distribution
This becomes especially relevant for services like window tinting in Apex, where film performance depends heavily on substrate quality and surface preparation accuracy.
Cost vs Risk Decision Framework
When evaluating DIY versus professional removal, consider three factors:
1. Material Sensitivity
Rear glass and aged adhesive systems dramatically increase the risk of failure.
2. Repair Cost Exposure
Glass replacement or defroster repair costs often exceed professional removal pricing.
3. Future Installation Requirements
Poor removal can compromise later services such as Apex NC window tinting, requiring additional correction work before new film can be applied.
In most real-world cases, professional removal is more cost-efficient when long-term outcomes are considered.
In Summary
DIY window tint removal introduces unpredictable risks that can permanently affect glass clarity and electrical defroster systems. While it may appear cost-effective initially, it often leads to higher long-term expenses due to damage or incomplete removal.
Professional removal services from Ceramic Pro Raleigh provide controlled thermal application, chemical-safe adhesive breakdown, and consistent surface restoration, ensuring the glass is properly prepared for future applications such as window tinting.
For vehicle owners who value clarity, safety, and long-term performance, professional removal remains the most reliable and cost-efficient approach when all risk factors are considered.
Contact us today to schedule a consultation or service appointment and restore your vehicle’s glass to optimal condition.
People Also Ask
Is DIY tint removal worth the risk?
It may be acceptable for a very new tint, but the risk increases significantly with age and rear window defrosters.
Why does tint leave residue?
Because aged adhesives do not fully release without controlled heat and chemical neutralization.
Can tint be removed without heat?
Yes, but it significantly increases tearing and surface damage risk.
Is professional tint removal necessary?
It is strongly recommended for older vehicles and any glass with embedded defroster systems.